Prerequisites
You must know either C or C++ to be able to follow this tutorial at all. If you know Java or C#, that’s not good enough, you need to know C or C++. Along with C/C++ you need to have a decent understanding of memory. By this I mean that you need to understand how the stack and heap work, along with a very good understanding of pointers. If you don’t understand the output of the following code, then you really need to learn more.
Open Me
int main()
{
    typedef struct
    {
        char *name;
        int age;

    } person;

    person p1 = {"Experiment5X", 1337};

    //Not to say that you should ever write code like this,
    //I'm just trying to prove a point here, lol.
    printf("%i
", *(int*)((char*)&p1 + sizeof(char*)));
    return 0;
}
Some good places to learn are as follows, in order of difficulty:
- My C Tutorials. If you have no experience in C or C++ then this is where you need to start. If you already know C#, then you can skip to the first video about pointers.
- Introduction to the stack and heap. Good place to start if you already know some C/C++ but don’t know that much about memory.
- Programming Paradigms from Stanford. Watch the first 15 or so lectures, once they get into threading, you can stop.
- More in-depth on the stack and heap.
If after reading/watching all the above stuff you still don’t understand, then you’re on your own.
Introduction
PowerPC is an assembly language. Basically what that means is that each instruction that you write, is actually an operation that the processor is performing, unlike a high level language like C or C++ where it has to be compiled to assembly or machine code. So with PowerPC you, the programmer, are directly communicating with the processor. Because PowerPC is an assembly language, you cannot run it on just any computer, you have to run it on a machine that uses a PowerPC processor, *cough the Xbox360 *cough cough. The only way that I know how to run PPC is using inline assembly in C++, and then running it on a DevKit. However, if you don’t have a DevKit and you still want to learn PPC, I encourage you to. You’ll still be able to read Xbox360 executables (.xex files), in IDA.
Chapter One
Registers
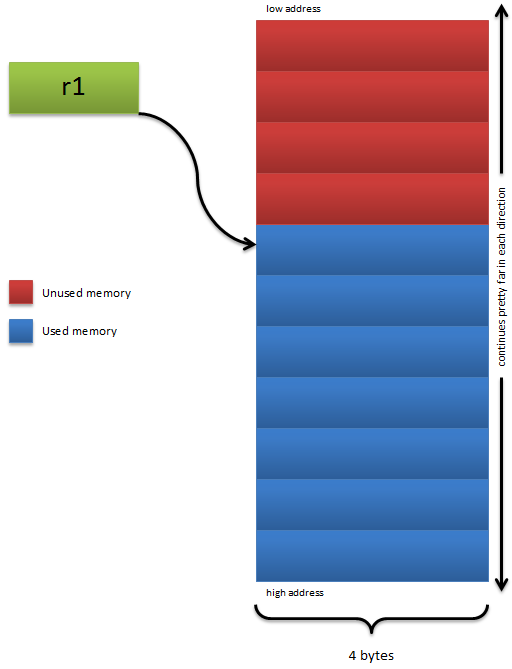
Registers are sort of like variables, registers are stored on the processor itself. This means that the processor has very fast access to these values. So it can refer to these values faster than it can refer to something stored in memory, or RAM. Also, registers aren’t addressable meaning that you can never have a pointer storing the address of a register. There are a bunch of registers in PowerPC, but the ones that we are going to be starting off with are referred to as general purpose registers, or GPRs. In PPC there are 32 general purpose registers, r0-r31, and each one of these registers is 32 bits in size, 4 bytes. You can use these registers however you would like, hence general purpose. So the same registers are used for storing pointers, uints, ints, chars etc. PowerPC cannot tell, nor does it care, if you are storing an address or some other value in a register. So it goes:
r0, r1, r2, r3, r4...r30, r31
In order to perform an operation on a value, we must do it through a register, so they are sort of like middlemen. If we wanted to add 4 to a number that is on the stack, we would first have to load that value, then we could add to it, and finally we can put the updated value back into memory. We’ll get into this sort of thing later.
Basic Instructions
To start off we are only going to be looking at a few very basic instructions. The most basic
instruction of them all is li, which stands for load immediate.This instruction will simply load a register with an immediate value, so a constant. This constant value needs to be only 16 bits in size, and signed, so the range is -32768 to 32767, we’ll get into why this is, and how to “get around” it later. So if we wanted to load register 3 with the value 10, we’d do:
li r3, 10
The above code will simply load r3, register 3, with the value 10. Instructions in PPC, or any assembly language for that matter, are said to have operands, not parameters. To separate operands in PPC, when using an instruction, we put commas in between them. So the li instruction requires 2 operands, the first is the target register, and the second is the value to be loaded into the target register.
Another very basic but useful instruction is the mr instruction, which stands for move register. Basically all this instruction is going to do, is copy the value in one register to another. This instruction takes 2 operands, the first is the destination, so the register where the value will be copied to, and the second operand is the source, so the value to copy. Let’s take a look at this in action.
li r3, 6
mr r4, r3
All the above code is doing, is loading r3 with the value 6, then copying the contents of r3 to r4. So after this code runs, both r3 and r4 will have a value of 6.
The next instruction that we are going to be looking at is addi, which stands for add immediate. This instruction takes 3 operands, the first is the destination register, so the location where we want to store the sum of the operation. The second is the register that we want to add to, and the third is an immediate value that will be added to the second operand. Let’s take a look at an example:
li r3, 4
addi r4, r3, 6
After the following code executes, the value in r4 will be 10. First, we use li to load
r3 with the value 4. Then we use the addi instruction to add 6 to whatever value is in r3, which is 4, and then it stores the sum of the operation in r4.
Typically, whenever you see an i in an instruction name it means that one of the operands needs to be an immediate value. For example both li and addi require an immediate value as
one of their operands. Also, make sure you remember that you can only use signed 16 bit integers as immediate values.
There are many different forms of the add instruction, but
the only other one that we are going to be looking at is just plain old add. What’s the difference between add and addi you may ask? Well the only difference is that the third operand in add has to be a register, whereas for addi the third operand needed to be an immediate value. So to use the add instruction successfully, we’d need to do something like this:
li r3, 7
li r4, 8
add r4, r3, r4
So the above code will load r3 with 7, load r4 with 8, and then add the values of the two registers together, and store the sum in r4. So after this code executes, the value in r4 will be 15. If we tried to replace the last operand with an immediate value, it wouldn’t work, we’d have to use add for that. Another helpful, and common, operation is subtracting. You can add negative values to registers, so if you really wanted to you could do something like this:
li r3, 5
addi r3, r3, -3
And that would basically just add a negative value to r3, so after the above code is executed, r3 would hold a value of 2. Since 5 + (-3) = 2. There actually is a subtract instruction though, which I prefer because it just makes more sense in my head, and that instruction is subi which stands for subtract immediate. And you guessed it, we need to provide an immediate value as one of the operands. The subi instructions takes 3 operands. The first operand is the destination register, so the difference will be stored here. The second operand is the register that you want to subtract from, and the third operand is an immediate value, which is the amount that you want to subtract from the second operand. So, let’s look at the following example.
li r3, 4
subi r3, r3, 3
The first thing the above code does is load r3 with 4, then we subtract 3 from r3 using the subi instruction. Therefore the value in r3 after the above code is executed would be 1, since 4 - 3 = 1. That instruction subi, requires an immediate value, so we can’t subtract a register from a register using that instruction, but let’s say that we wanted to. Luckily there is the subf instruction which stands for subtract from. The operands for this one are a little bit different than the ones for subi. The first operand, like always, is the destination register, so the difference of the other two operands will go here. The second operand is the register that we want to subtract from the third operand. So we are subtracting operand 2 from operand 3. So let’s take a look at this in action.
li r3, 6
li r4, 1
subf r5, r4, r3
So here we are subtracting r4 from r3, and storing the difference in r5. So after this code runs, r5 will have a value of 5.
Now let’s look at multiplying stuff. The first multiply instruction we are going to be looking at is mulli, which stands for multiply low immediate. If you’re wondering why it’s multiply low immediate, and not just multiply immediate, then you can click the spoiler, but for right now, it doesn’t really matter.
[details=Open Me]PowerPC’s registers are actually 64 bits, it’s just that on the Xbox we can only use the low 32 bits of them. So…

In the mulli instruction, the low in it’s name means that it is only going to multiply the low 32 bits of the register by the immediate value, and since we only have access to the low 32 bits anyways, it doesn’t matter.
li r3, 5
mulli r4, r3, 7
The above code is loading r3 with the value 5, then, using the mulli instruction, it multiplies the value in r3 by 7. Finally it stores the product of the operation in r4. Now let’s take a look at multiplying two registers together. The instruction to do that is mullw, which stands for multiply low word. If you’re wondering what a word is, it’s a 32 bit signed integer. This instruction, like mulli, takes 3 operands. The first is the destination register, so the register where the product will be stored. The last two operands are just the registers that you want to multiply together. Let’s look at an example.
li r3, 2
li r4, 9
mullw r5, r4, r3
This code snippet will load r3 with 2, load r4 with 9, and then
multiply the two registers together. So after this code runs, r5 will have a value of 18.
Now we are going to look at dividing. There is only one instruction that we’re going to be looking at for dividing. Sadly, there isn’t a divide instruction that takes an immediate value as an operand, so that’s why we’re only looking at the one instruction. The instruction we’re going to look at is divw, which stands for divide word. The divw instruction takes 3 operands. The first, is the destination register, the location that the quotient will be stored. The second operand is the dividend, and the third operand is the divisor. So let’s try this stuff out.
li r3, 10
li r4, 5
divw r5, r3, r4
So here, we are just loading r3 with 10, and r4 with 5. Then we divide r3 by r4 and store the quotient in r5 . So after this code does it’s thing, r5 will be 2.
So this is the end of Chapter One. Click here for the Chapter One quiz.
[/details]
Chapter Two
Summary
In this chapter we are going to be looking at comparing registers with other registers/immediate values. Also we are going to be looking at branching, referred to as jumping in some other assembly languages, and labels. Once you learn all that stuff you will be able to make decisions in your assembly code.
Condition Registers
The condition registers are used to store information about a comparison, such as whether or not two things are equal. There are eight condition registers, cr0-cr7. We are not going to be using cr1 because that is for floating point registers, which is a whole different discussion. So for right now, only use cr0 and cr2-cr7. Each condition register is 4 bits in length, and each bit corresponds to a certain condition. The format of each condition register is as follows:

All the condition registers are right next to one another to form a 32 bit register called CR, which stands for condition register. All eight of the four bit condition registers make up this register. So it looks something like this:

Compare Instructions
Now that we know where comparison data is stored, we now need to take a look at how to compare registers with other registers/immediate values. The first instruction that we are going to be looking at is cmpw, and this stands for compare word. And remember from the first chapter that a word is a signed, 32 bit integer. This instruction takes two operands, two registers. All this instruction will do, is compare the two registers, and store the information about the comparison in cr0. If the first operand’s value is less than the second operand’s value, then the LT, less than, bit will be set in cr0. If the first operand’s value is greater than the second operand’s value, then the GT, greater than, bit will be set in cr0. Otherwise, if both operands’ values are the same, then the EQ, equal, bit will be set in cr0. So let’s take a look at a couple examples.
li r3, 4
li r4, 5
cmpw r3, r4
Condition Register 0 will look like...

The code above will simply load r3 with 4, load r4 with 5, and then compare r3 and r4. Since r3’s value is less than r4’s, the LT, less than, bit is set in cr0. Now let’s look at an example where the GT bit is set.
li r3, 11
li r4, 7
cmpw r3, r4
Condition Register 0 will look like...

This code will load r3 with 11, and load r4 with 7. Then it’s simply going to compare the values in the registers. So after this code runs, the GT, greater than, bit will be set in cr0 because the value in r3 is greater than the value in r4. Finally, we’re going to take a look at an example where both registers have the same value.
li r3, 5
li r4, 5
cmpw r3, r4
Condition Register 0 will look like...

Here, we’re loading both r3 and r4 with the value 5. Then we compare those registers using the cmpw instruction. Since both of the registers have the same value, the EQ, equal, bit is set in cr0.
Up until now, all the information about comparisons has been stored in cr0. With the compare instructions, you can specify what condition register you want the information to be stored in. To do so, you simply make the first operand of the cmpw instruction the condition register you want the information to be put in. Then, you make the second and third operands the registers that you want to compare. So let’s look at an example.
li r3, 6
li r4, 9
cmpw cr6, r3, r4
Now, instead of the LT bit being set in cr0, it will be set in cr6 because we explicitly told it to. We made the first operand of the cmpw instruction the condition register that we wanted the information in.
Now let’s take a look at comparing registers with immediate values. It turns out that it really isn’t that much different from comparing two registers. The instruction to compare a register with an immediate value is cmpwi, which stands for compare word immediate. Just like the cmpw instruction we have the option of specifying the conditional register to store the information about the comparison in. So for this instruction you can provide either two or three operands. If you provide two, the first needs to be a register, and the second needs to be an immediate value, so a signed 16 bit integer. If you provide three operands, then the first needs to be the condition register to store the information in, the second needs to be a register, and the third needs to be an immediate value. First, let’s take a look at the two operand version.
li r3, 15
cmpwi r3, 10
Condition Register 0 will look like...
In this code, we are simply loading r3 with 15, and then we compare the value in r3 with 10. Since 15 is greater than 10, the GT bit is set in cr0. Now let’s look at the three operand version.
li r3, 6
cmpwi cr6, r3, 10
Condition Register 6 will look like...

Here, we are loading r3 with 6, and then we compare the value in r3 with the immediate value 10. Since 6 is less than 10, we set the LT bit in cr6 because we specified that as our first operand.
Labels
Labels in PowerPC serve the same purpose as labels in C++ and C#. Basically a label is something you can use to mark off a place in your code that you want to branch, or jump, to. I think it’d be easier if I just showed you an example, rather than trying to come up with a definition for a label.
addNums:
     add r5, r3, r4
To create a label, all you need to do, is write a identifier, of your choosing, followed by a colon. This means that you can call your label anything, as long as it doesn’t start with a number, doesn’t contain spaces, dashes, or symbols. So my_Label1 is a valid label name whereas my Label%$1 isn’t a valid name.So as you can see in the code above, the label, is literally labeling some code. You can have 1, or a million lines of code after your label, it doesn’t really matter. Also, there isn’t really a limit to how many labels you can have. Why are labels useful you may ask, well, look at the next section.
Branching
Branching, referred to as jumping in some other assembly languages, will simply allow you to “branch” to a location in your code. Branching will allow you to go to labels. In order to branch we must use a branch instruction. The most basic branch instruction there is, is b, which just stands for branch. Most branch instructions take one operand, which is the location to branch to, in most cases it’s a label. So let’s take a look at an example of branching.
li r3, 6
li r4, 10
b addStuff
li r4, 2

addStuff:
    add r5, r3, r4
The above code is going to load r3 with 6, and then load r4 with 10. Right after that, it’s going to jump to the addStuff label, skipping over the li r4, 2. This means that the value in r4 when the add instruction is being executed will be 10, since we branched directly to the addStuff label, skipping any and all code in between the branch instruction and the label. After the add instruction is done, the next code that will be executed will be whatever, if any, code that follows the add instruction. It never goes back to where it previously left off. So the
li r4, 2 line of code will never be executed.
One other very important form of the branch instruction is blr, which stands for branch to link register. In later chapters we’ll talk about what the link register actually is, but for right now, this instruction is equivalent to the return keyword in C++ and C#. However, we cannot return values with this instruction, all that this instruction will do, is halt execution, and go back to wherever this function was called from. Let’s look at a quick example.
blr
li r3, 4
li r4, 6
This code is pretty much worthless, because all it’s going to do is return. Therefore, r3 and r4s’ values will never be changed, they will never be loaded with 4 or 6, respectively.
Now let’s take a look at something more interesting. The branch instructions will actually allow us to branch depending on the bits set in a condition register. So we can branch if the EQ bit is set, or if it’s not set. We could branch if the GT bit is set, or if it’s not set, and of course you could also branch if the LT bit is set, or if it’s not set. There are corresponding branch instructions for each bit in the condition register. They are as follows.

By default, the condition register that it will look at is cr0, but we’ll look at changing that later. So for now, let’s just look at a few examples.
li r3, 5
li r4, 10
cmpw r3, r4
blt addR3andR4
blr

addR3andR4:
    add r3, r3, r4
    blr
The first thing this code does, is load r3 and r4 with 5 and 10, respectively. Then, using the cmpw instruction, we compare the values in r3 and r4. The LT bit in cr0 will be set since r3’s value is less than r4’s. The next instruction says to branch to the addR3andR4 label if the LT bit is set in cr0, which it is. So then we branch to that label, next it adds the contents of r3 and r4 together, finally storing the sum in r3. Lastly, it returns from the function call. Let’s take a look at another example.
addi r3, r3, 10
cmpwi r3, 100
bgt sub100
blr

sub100:
	subi r3, r3, 100
The first thing that this code does, is add 10 to whatever value is in r3. Then we compare the sum of that operation with 100. If the value in r3 is greater than 100, then it will branch to the sub100 label, and subtract 100 from r3. If r3 was less than 100, then the function call returns. Let’s say that we didn’t have the blr instruction there. So it’d look like this:
addi r3, r3, 10
cmpwi r3, 100
bgt sub100

sub100:
	subi r3, r3, 100
So after we add 10 to r3, and compare the sum with 100, it will branch to the sub100 label if the value in r3 is greater than 100. Let’s say it wasn’t, we’ll say that r3 was 62, that means that it wouldn’t branch to the sub100 label. However, since we removed the blr instruction, it’ll just fall through. This means that no matter what, it’ll subtract 100 from r3. So if it doesn’t branch to the sub100 label, execution will fall through. This means that labels have no effect on the flow of execution. The only way to skip over instructions is through a branch. So let’s look at another example.
label1:
	li r3, 4
label2:
	li r4, 5
label3:
	add r5, r3, r4
The above code is the exact same as the code below, it does the same thing.
li r3, 4
li r4, 5
add r5, r3, r4
Since the processor will just ignore labels, the labels in the first example will just be ignored, so it will do the same thing as the code in the second example. However, you should only use labels if you plan on branching to them.
Now let’s tell the branch instructions what condition register to check. All that we need to do is make the first operand the condition register to look at, and then the second operand is the location to branch to, so a label in our case. Let’s take a look at an example of this.
li r3, 11
cmpwi cr6, r3, 11
beq cr6, someLabel
blr

someLabel:
	li r3, 0
	blr
Here we are loading r3 with the value 11. Then we compare the value in r3 to 11, and store the results of the comparison in cr6. When we go and do a conditional branch, we need to make sure we are checking cr6. To do that, we just made the first operand of the beq instruction cr6, and the second operand the label to jump to.
Alright, so this is the end of chapter two, you can take the quiz here.
Chapter Three
Summary
In this chapter we are going to be looking at creating our own functions, and accessing the parameters that are passed to theses functions that we create. Also, we’ll be looking at pointers and structs.
Creating our own Functions
We are going to be using inline assembly for everything, so to create a function, just do what you would do if you were creating one in C or C++. So just do something like what’s shown below. If you don’t have a DevKit, don’t worry. You’ll still be able to easily follow along with this tutorial, you just won’t be able to test anything out  .
.

Okay, so now you’re probably wondering how we can write PowerPC in Visual Studio, well it’s really easy, you can just do inline assembly. So just do this:

So from now on, just write all your code inside of that _asm block. Now that you know how to write PowerPC in Visual Studio, let’s take a look at making a function that does something. The most important thing to be able to do in a function is to be able to use the parameters. The first eight parameters of a function are passed through r3-r10. If you had eight integer parameters, the first would be in r3, the second in r4 and so on, all the way up to r10. We’ll talk more about this later, but for right now let’s get back to that function I had you create, sillyFunction. That function takes one integer parameter. This means that the value passed in as a the parameter is stored in r3. So if I did something like this:

Then, the value in r4 after this code will have ran, would be 15. This is because when I called sillyFunction, I passed 5 in is as the first parameter, loading r3 with 5. Then, I added 10 to the value in r3, which gives us 15.
Now let’s talk about the return value. The return value of a function is stored in r3. So let’s say that we wanted to return the value that we calculated in the previous example. Well, it’s pretty simple. We could do one of two things. We could move the value in r4 to r3, or we could just initially store the sum of r3 and 10 in r3. I’m going to go with the later of the two, because it requires less assembly instructions. So if we were to do this:

The value in someNumber after this code ran, will be 15. Now let’s create a function that is slightly more complex. Let’s make a function that will return the largest of two numbers. It’d look something like this:

The first line of the function compares the second parameter to the first parameter. If the second parameter is greater than the first, then we need to move r4, the second parameter, to r3, the return value. If the second parameter is less than or equal to the first parameter, then we need to return the first parameter. However, we don’t need to do anything, since r3 is already holding the value of the first parameter, so we can just return. In the example above, I pass through 7 and 11. Since 11 is greater than 7, someNumber will holding 11, after the code has run.
Now let’s take a look at a function that doesn’t take an int as a parameter. Let’s look at one that takes a character as a parameter. This function will return true if the character is a number character, so ‘0’, ‘1’, ‘2’ etc., and it’ll return false if it is anything else, for instance, ‘a’, ‘&’, ‘P’ etc. This is the function that I came up with:

Chars, just like ints are stored in registers when passed as parameters. So that means that in the above function, the character, passed as a parameter, would be stored in r3. The first thing that we do is compare the value of the character with 48, which is the value of the ‘0’ character. If the character’s value is less than 48, then we know that it can’t be a number character, so we return false. We load r3, the return value, with 0, which is the value of a bool that is false. If however, the character’s value is greater than 48, then we compare the value in r3 with 57, which the value of the ‘9’ character. If the character’s value is greater than 57, then we know that it cannot be a number character so we return false. If the character’s value is between 48 and 57, inclusive, then we return false. So if I were to call the function, like this:
![]()
Then the value of the bool b, would be false, since ‘a’ isn’t a number character.
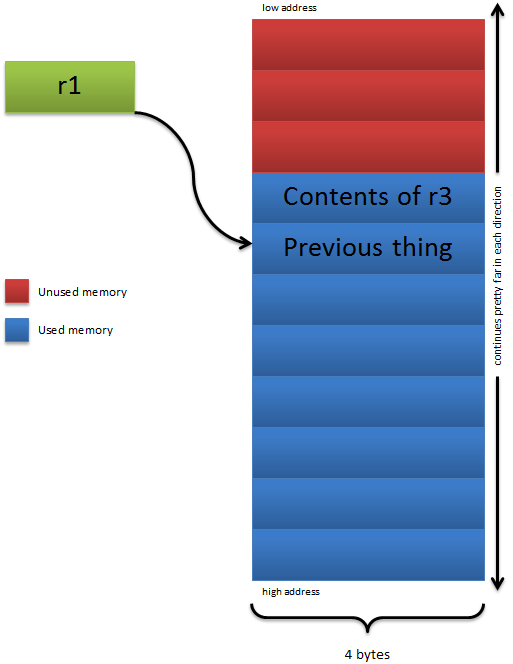
Now let’s take a look at pointers. So let’s say that we made a function that took a pointer as a parameter. The pointer itself will be stored in r3, so we somehow need to go to the address that is in r3 and read the 4 bytes at that location, assuming the pointer is an integer pointer. The instruction to read memory at a certain address is lwz which stands for load word and zero. This instruction takes 2 operands, the first is the destination register, so the register that the value will be read into, and the second operand is the address of the word that you want to load the first operand with. So let’s assume that r3 is an integer pointer, in the following example.
lwz r4, 0(r3)
So that’s how we’d load r4 with the word, aka the 4 byte integer, at the address in r3. The parenthesis around r3 tell the processor that r3 is a pointer and that we need to go to that address. The number out in front of the parenthesis is the byte offset. So the address of the word we are loading r4 with is r3 + the byte offset. Since we have the byte offset as 0, we will be loading r4 with the word is at the address in r3. Maybe it would help a little bit more if you saw a picture.

Now let’s look at a short pointer. So we’ll say that r3 is a short pointer. Again, the pointer itself will stored in r3. So if we want to load the short into r4, we’d want to use the lhz instruction, which stands for load half word and zero. A word in PowerPC is 32 bits, so that means a half word would be 16 bits, or a short. So the lhz instruction is very similar to the lwz instruction, the only difference is that the lhz will only read 2 bytes, whereas the lwz will read 4 bytes. Let’s get to an example.

As you can see in the above example, the doStuff function takes a short pointer as a parameter. This means that when the function is called, r3 will be loaded with the address of a short. In order to access the short that is at that address we use the lhz instruction. Remember from the lwz examples that we need to put the parenthesis around r3 to tell the processor that it’s a pointer. So that line of PPC, will go the address in r3, and read 2 bytes. It’ll then store those two bytes in r4.
Finally, we’ll look at an example of a character pointer. The instruction to read a byte a certain address is lbz which stands for load byte and zero, this is exactly the same as the lwz and lhz instructions. The only difference is that the lbz will read a single byte. Now we’ll look at this bad boy in action.

I’m not really sure if this needs much of explanation since it’s so similar to the other two instructions, but here we go anyways. Since this function takes a character pointer as it’s only parameter, when the function is called, the pointer itself, so a character’s address, will be put into r3. If we want to get the byte at that address we’d just use the lbz instruction. Like the other two loading instructions, we need to put parenthesis around r3 to tell the processor that it’s a pointer. We also need the 0 out in front to say how many bytes from that address we need to go, since it’s a zero, we read the byte at the address stored in r3.
The next thing that we are going to be looking at is writing data to a certain location in memory. So let’s say that we have a function that takes an integer pointer, and we want to set the integer at the address in the pointer equal to 0. To do such a thing, we’d want to use the stw instruction, which stands for store word. The first operand is the value that you want to store at a certain address. This operand must be a register, it cannot be an immediate value. The second operand is the address at which you want to store the value in the register. You have to set up this operand the same way that you have to in the load instructions. So we need parenthesis around the register holding the address, and in front of the parenthesis we need an immediate value, which serves as the byte offset. To set the integer at the address in r3 equal to 0, we’d need to do the following.

Here, we load r4 with the value 0, which is what we want to set our integer equal to. The next thing that we do, is use the stw instruction to set the integer at the address in r3 equal to zero. If I were to call this function, like this:

After the above code runs, i will be holding the value 0, because the doStuff function changed it’s value.
There are two other storing instructions that we’ll be looking at in this chapter, and they are sth, which stands for store half word, and the other one we’ll look at is stb which is store byte. I’m not going to be making an example for sth just because it’s so similar to the other two. So, let’s look at using the stb instruction.

As you can see, this instruction is very similar to the stw instruction. The above code will overwrite the byte at the address in r3 with 0, pretty simple I hope.
The last thing that we’re going to be looking at in this chapter, is passing the address of a struct as a parameter. So let’s say that we have a fraction struct, with two integer fields, numerator and denominator. Then we have a function that takes the address of a fraction as a parameter. We’ll be looking at accessing the different fields inside of that struct. This is what the prototype and struct look like.

So now, inside of our do stuff function let’s change the fraction’s values around, to find it’s reciprocal. First, we need to solve the simpler problem of loading it’s fields into registers. First let’s load the fraction’s numerator value into r4. This isn’t too hard because the address of the fraction is the address of the first field in the struct, and the first field in the struct is the numerator. So to load the numerator into r4, we could just do…

Now we need to think about getting to the second field, the denominator. Well we know that r3 holds the address of the first field, and we know that the second field comes right after the first in memory. We also know that the size of an integer is 4 bytes. So in memory, the struct looks like this:

This means, that the address of the denominator is the address of the numerator plus 4, this size of an int. So to read the denominator into r5, we could do something like this:

Here we are reading the integer into r5 at the address in r3 plus 4, which is the size of an integer. So now, to finish our function, to get the reciprocal we need to write them back to memory in opposite places, so we’d do this…

Pretty simple really. We just write the denominator value to the address of the numerator, and write the numerator to the address of the denominator.
Now let’s take a look at something that doesn’t work out so nicely. Let’s say we had a struct like this:

This isn’t work out so cleanly because pointers have to be at an address that is divisible by 4, same with integers. So all primitive types in C and C++ need to be at an address that is divisible by it’s size in bytes. So a bool and a character can be at any address since they are only one byte. Shorts must be at an even address since they are 2 bytes, pointers, integers, and longs (on most computers) need to be at an address divisible by 4 since all those types are 4 bytes in size. Lastly, long longs need to be at an address divisible by 8 since they are eight bytes long. So back to our struct. Let’s say that the address of the first field is 0x7004fd20. The first field is a bool, so it only takes up one byte. The next byte in memory that can be written over is 0x7004fd21, and we need to put a char pointer there. Well we can’t because the address 0x7004fd21 isn’t divisible by 4, the size of a character pointer. So what it does, is skip over 3 bytes, so it goes to the next address that is divisible by 4,which would be 0x7004fd24. Then when it needs to put down the next character pointer, the last name pointer, it has no problem because 0x7004fd28 is divisible by 4. Following the last name char* is a single character, which screws things up. It puts that character down at the address 0x7004fd2C, making the next available address 0x7004fd2D, which isn’t divisible by 4. We need to put down an integer, so we need something divisible by 4. Just like before, it’ll skip over 3 bytes so that it can put down the integer at an address divisible by 4. So if we were to create an instance of our struct, it would look like this:

Now let’s just go ahead and write a function that takes a person pointer. This function will return a bool indication whether or not the person can legally buy/consume alcohol in the US. So in other words, if the person’s age is less than 21, then this function will return false, otherwise it’ll return true. So we know from looking at the diagram above that the person’s age is at the address of the struct plus 16 bytes. Creating this function is really simple now that we have this diagram. So the function would look something like this:

This function is really easy to write now that you know how to get to the age in memory. Once we load the age from memory, we compare it to 21. Then we branch to the returnTrue label if the value in r4, the person’s age, is greater than or equal to 21. Otherwise we load r3 with false, and return.
So this is the end of chapter three, you can take the quiz here.
Chapter Four
Summary
In this chapter we are going to be looking at looping. I probably should have integrated this into a previous chapter, but whatever. The point is you should learn about looping before we move on to anything too difficult. Most of the stuff associated with looping you have already learned, such as branching, and labels, but there are a few more things that we can add to it.
The Count Register
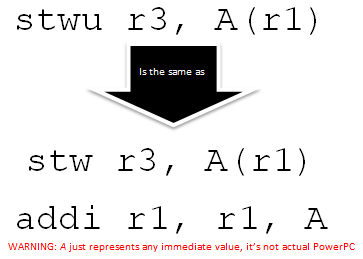
The count register is 32 bit register that is most commonly used to hold the counter for a loop, although you can use it for anything you want. Using the counter register, or CTR, is easier than using a GPR to hold a loop count, and you’ll see why this is as we move along. You cannot load the CTR, aka the count register, with a value like you would a GPR. You cannot use the li instruction to place a value in the CTR, instead you need to use an instruction called mtctr, which stands for move to CTR. This instruction takes one operand, and it is the value that you want to put in the CTR, and it must be a register, it cannot be an immediate value. So if we wanted to load the CTR with the value 10, then we’d have to do something like this:
li r3, 10
mtctr r3
Since we cannot give the mtctr instruction an immediate value, we must first load the immediate value into a register, and then give that register to the mtctr instruction.
If you ever wanted to perform an operation on the CTR, like adding, subtracting etc., you’d have to do it indirectly. You’d have to read the value from the CTR into a GPR, perform the operation, and then put the value back into the CTR. To get the value in the CTR, we can simply use the mfctr instruction which stands for move from CTR. This instruction takes one operand, it is the destination register, so the register that the CTR’s value will be copied to. If we wanted to add 7, to the CTR, we’d have to do something like this:
mfctr r3
addi r3, r3, 7
mtctr r3
First, we copy the value in the CTR to r3, then we simply add 7 to r3, then we copy r3’s value back into the CTR.
Looping with the CTR
Looping with the count register is really easy thanks to a little instruction called bdnz which stands for branch decrement not zero. This instruction will decrement the count register, and then it will only branch to the address supplied as the first operand if the value of the count register, after being decremented, isn’t 0. Like I mentioned above, the bdnz instruction takes one operand, it is the address that it will potentially branch to. So let’s look at a loop.
li r3, 10
mtctr r3

loopTop:
	addi r4, r4, 5
	bdnz loopTop
The first thing that we do, is put 10 into the CTR, then it adds 5 to whatever value is in r4, then it comes down to the bdnz instruction, here, it decrements the CTR, so the value of the CTR is now 9, then it will only branch to the label loopTop, if the value in the CTR isn’t 0. Since the value in the CTR is 9. So it will loop through that addi instruction 10 times. Although that code is pointless, I hope that helped you understand looping in PPC.
Let’s take a look at a more practical use of looping in PowerPC. We’ll make a function that will generate the first n numbers in the Fibonacci sequence, and store those numbers in an array, that is passed in as a parameter. So the prototype of the function would look like this:
![]()
Now let’s look at the function itself.

The first thing that it does is load r5 with the first value in the sequence, which is 0, and then it loads r6 with the second value in the sequence, which is 1. After this instruction, it does different things depending on the value of n. So I’m going to go through each value of n individually.
If n is 1
The next instruction it has to execute is the cmpwi instruction. Here, we are comparing n with 1. If n is 1, then we only need to put the first number in the sequence in the destination array. The instruction after the comparison will branch if n equals 1, which it does. So it goes down to the store1 label, and it simply stores the first number in the sequence in the array. Since there is nothing else for it to do, it returns.
If n is 2
Just like above we first compare n with 1. Since n isn’t equal to 1, it won’t branch to that label, it’ll just continue on. The next couple instruction will store the first two numbers in the sequence in the array called dest. After storing the first two numbers in the sequence, we check and see if there is anymore work to be done. If n is 2, then there is nothing else for us to do, we already “generated” the first two numbers in the sequence. So we will use the cmpwi instruction to compare n with 2. If they are equal, then we will return, well we’ll branch to a label that will return.
If n is greater than 2
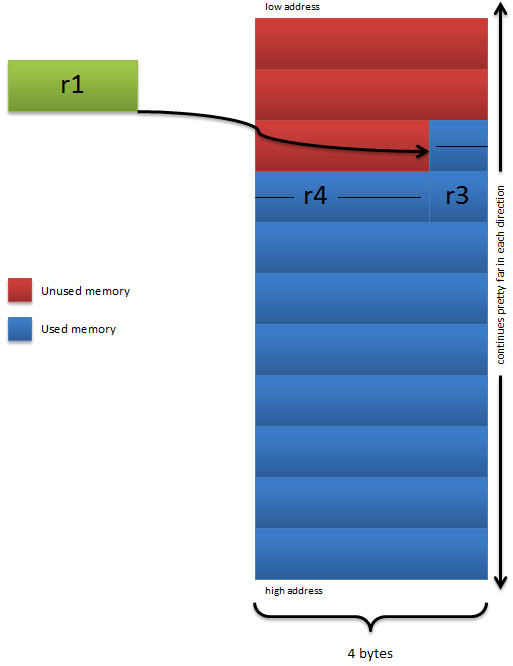
We will say that n is 6 in this example. First, we must compare n with 1, to see if we only need to generate one number, since n is greater than 1, it won’t branch to that label. So just like above, it’ll store the first two numbers in the sequence in the array. Right after that it’ll compare n with 2 to see if anything else needs to be done. Since n is greater than 2, it’ll continue on, because it needs to generate the rest of the numbers. After the comparison, we subtract 2 from n since we already generated and stored the first two numbers in the sequence. After that, we put n into the CTR so that we loop the correct number of times later on. After we set up the count register, we add 8 to r4, which is the destination array. We do this so that r4 now stores the address of the next element in the array, since the first two are filled up with the first two Fibonacci numbers. If this is confusing, take a look at the following diagram.

As you can see from the diagram, all we’re doing is having r4 store the address of the next element in the array. Once we fix the array, we will generate the next number in the sequence, and this is really easy to do. To get the next number, we simply calculate the sum of the previous two. So we just add r5 and r6, to get the next number in the sequence. Then, we make the old first value the new first value, and we make the old first value, the new calculated value. So we are basically just moving along the sequence, generating the next number as we go. Maybe it’d help to look at a picture.

After we generate the next value, we store it in the array. We just store at 0 of r4, since we changed the value of it to point to the next element before we entered the loop. After we store the value, we add 4 to r4 so that it once again will point to the next element in the array. This will just set it up for the next iteration. The only thing left to do is loop back to the top. So it will decrement the CTR, and then branch as long as it’s not 0, which it isn’t. So it will just keep looping and looping through that code until it has filled the array with the first n numbers in the Fibonacci sequence. Here is a video of me stepping through the code.
You don’t have to use the count register if you want loop, however it is the easiest way. Instead, you could keep the counter in a GPR, and increment/decrement it each iteration. So we could do something like this if we wanted to.
li r3, 0
loopStart:
    //some code to loop through
    addi r3, r3, 1
    cmpwi r3, 10
    blt loopStart
So first we load r3 with 0. This means that instead of decrementing our counter each time, we are incrementing it. The we enter the loop, and it’ll execute whatever code you want it to run through. After it completes that, we increment our counter, and then we compare it with 10. We will loop back to the top as long as the counter is less than 10. This means that it’ll loop 10 times. You can loop through things this way if you prefer it, but using the CTR is easier in my opinion.
This is the end of chapter four. You can take the quiz here.
I’ll add more chapters later. If you find any grammatical/programmatical errors, tell me so I can fix them.
Places I learned from:
IBM
Some PPC Book